> ## Documentation Index
> Fetch the complete documentation index at: https://context7-ctx7-2006-setup-with-cli-at-on-premise.mintlify.site/llms.txt
> Use this file to discover all available pages before exploring further.
# On-Premise Deployment
> Run the full Context7 stack inside your own infrastructure, so code and documentation never leave your environment
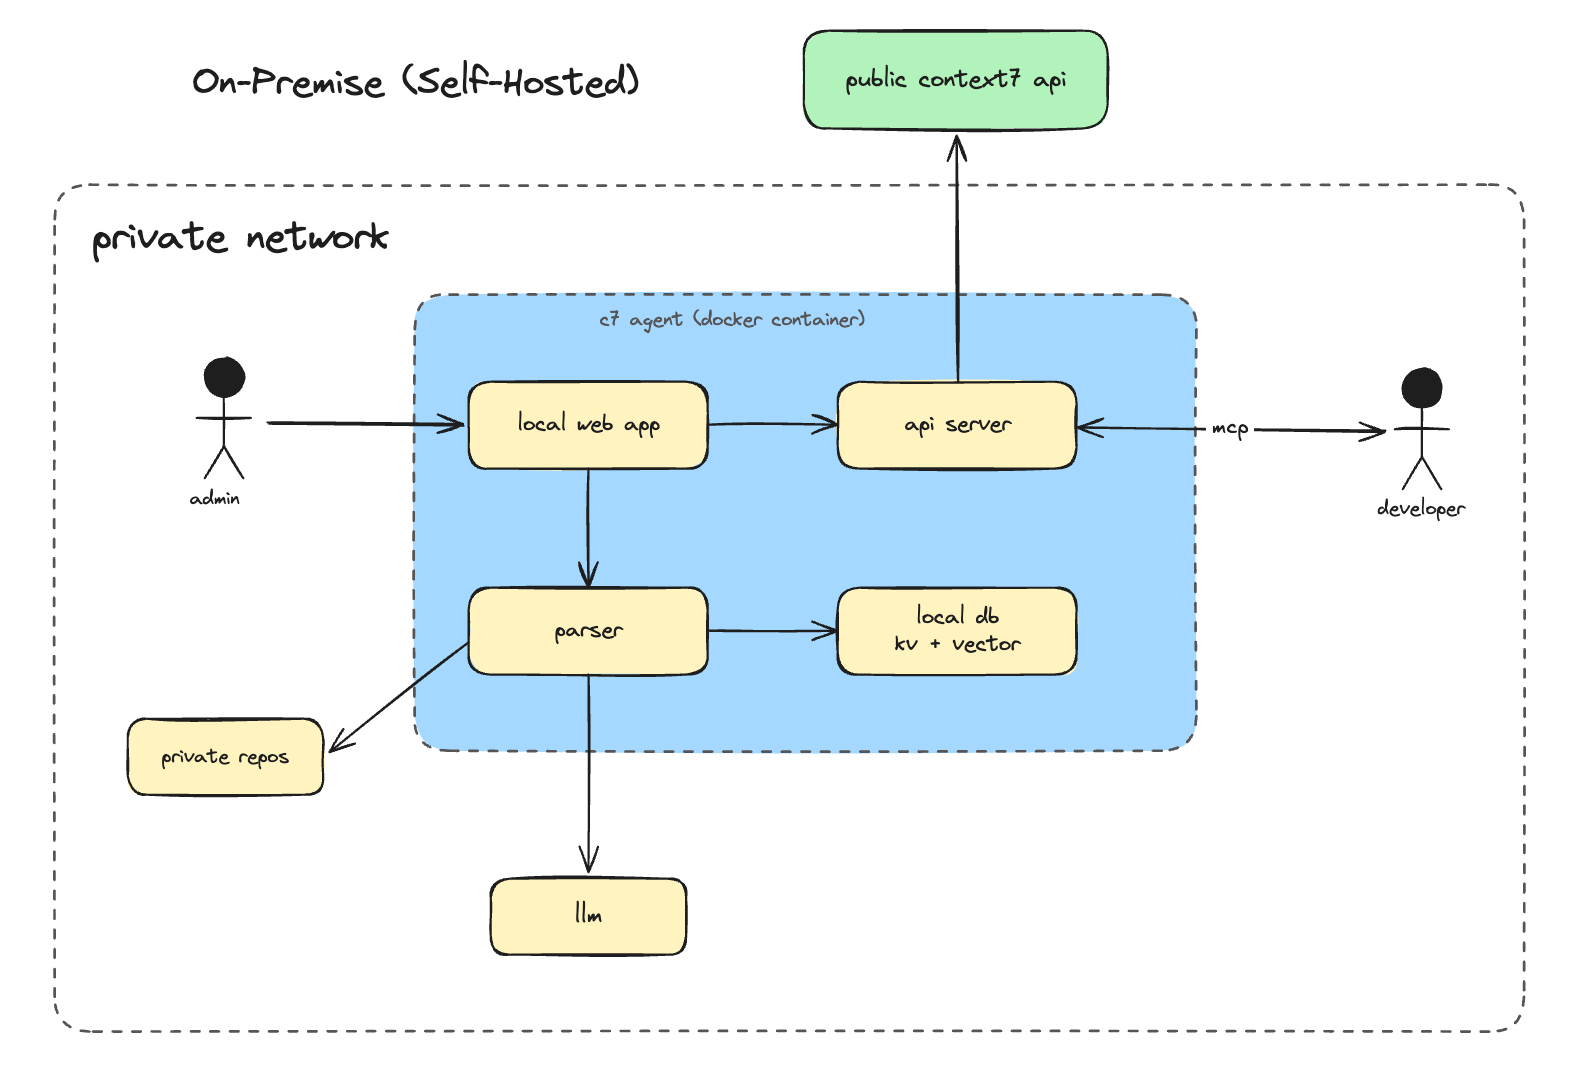
Context7 On-Premise lets you run the full Context7 stack inside your own infrastructure. Your code, documentation, and embeddings never leave your environment.
## What's Included
* Full Context7 parsing and indexing pipeline
* Local vector storage (no external vector DB required)
* Built-in MCP server. Works with any MCP-compatible AI client
* Web UI for managing indexed libraries and configuration
* REST API compatible with the public Context7 API
* Private GitHub and GitLab repository ingestion
 ## Setup
Go to [context7.com/plans](https://context7.com/plans) and click **On-Premise Trial**. Fill out the request form. No credit card required. You'll receive a 30-day full-featured license key via email once approved.
Follow the deployment guide for your platform:
Deploy with Docker Compose
Deploy on Kubernetes with raw manifests
Open `http://localhost:3000` in your browser. On first launch, the setup wizard guides you through configuring:
1. **AI Provider** - Choose OpenAI, Anthropic, Gemini, or a custom OpenAI-compatible endpoint. Enter your API key and model name.
2. **Embedding Provider** - Use the same provider as your LLM, or configure a separate one for embeddings.
3. **Git Tokens** - Add a GitHub and/or GitLab token for the platforms you use.
All configuration is stored locally in the embedded database and can be updated later from the Settings page.
From the dashboard, click **Add Repository** and enter a GitHub or GitLab URL. Once ingestion completes, your private docs are ready to query.
You can also add libraries via the REST API:
```bash theme={null}
curl -X POST http://localhost:3000/api/parse \
-H "Content-Type: application/json" \
-d '{"repoUrl": "https://github.com/your-org/your-repo"}'
```
## Connecting Your AI Client
The Context7 CLI is the recommended way to connect an AI coding agent. Install it once on the machine that runs your client:
```bash theme={null}
npm install --global ctx7@latest
```
```bash theme={null}
npm install --global ctx7 \
--registry https://npm.internal.yourcompany.com
```
For restricted or air-gapped environments, mirror the `ctx7` package and its dependencies in your approved internal npm registry. Once installed, on-premise setup does not contact npm, GitHub, or Context7 Cloud. It uses bundled rule and skill content and contacts only your deployment to discover its MCP authentication setting.
Pass the root URL of your deployment (without `/mcp` or `/api`) and select the client:
```bash theme={null}
ctx7 setup --mcp \
--base-url https://context7.internal.yourcompany.com \
--claude
```
```bash theme={null}
ctx7 setup --mcp \
--base-url https://context7.internal.yourcompany.com \
--cursor
```
```bash theme={null}
ctx7 setup --mcp \
--base-url https://context7.internal.yourcompany.com \
--codex
```
```bash theme={null}
ctx7 setup --mcp \
--base-url https://context7.internal.yourcompany.com \
--opencode
```
Setup reads the deployment's MCP authentication setting. When MCP authentication is disabled, no credential is written. When it is enabled, sign in to the on-premise dashboard and click **Generate setup key** in the Connect card. Run the command for your client and paste the one-time-visible key when the CLI requests it with hidden input.
For non-interactive automation, provide the personal key through the environment:
```bash theme={null}
CONTEXT7_API_KEY=ctx7op-... ctx7 setup --mcp --yes \
--base-url https://context7.internal.yourcompany.com \
--claude
```
You can use `--api-key ctx7op-...` instead, but command-line arguments may be retained in shell history. Setup writes the MCP client configuration, a Context7 rule, and a bundled `context7-mcp` skill. The bundled files mean the deployment does not need to expose Context7 Cloud's skill APIs.
Custom `--base-url` setup uses the deployment's Streamable HTTP endpoint. Hosted OAuth, local stdio transport, and CLI-query mode are not available for on-premise targets.
### Manual configuration
If your client is not supported by `ctx7 setup`, point it at `/mcp`. When MCP authentication is enabled, send the personal key as a standard bearer token:
```json theme={null}
{
"mcpServers": {
"context7": {
"url": "https://context7.internal.yourcompany.com/mcp",
"headers": {
"Authorization": "Bearer ctx7op-..."
}
}
}
}
```
For other clients, see [All Clients](/resources/all-clients).
## Configuration
### Environment Variables
These are set in your `docker-compose.yml` or `.env` file before starting the container.
| Variable | Required | Description |
| ------------- | -------- | ------------------------------------------------------ |
| `LICENSE_KEY` | Yes | License key issued by Upstash |
| `PORT` | No | HTTP port (default: `3000`) |
| `DATA_DIR` | No | Data directory inside the container (default: `/data`) |
AI provider keys, model settings, and git tokens are **not** set via environment variables. They are configured through the setup wizard and can be updated anytime from the Settings page in the web UI.
### AI Provider Settings
Configured via the **Settings** page in the web UI.
| Setting | Description |
| ------------ | ------------------------------------------------------------------- |
| LLM Provider | `openai`, `anthropic`, `gemini`, or custom |
| LLM API Key | API key for your chosen provider |
| LLM Model | Model name (e.g. `gpt-4o`, `claude-sonnet-4-5`, `gemini-2.5-flash`) |
| LLM Base URL | Custom OpenAI-compatible endpoint (for local models or proxies) |
#### Examples
```
Provider: custom
Base URL: https://openrouter.ai/api/v1
Model: openai/gpt-4o
API Key: sk-or-v1-...
```
```
Provider: custom
Base URL: http://host.docker.internal:11434/v1
Model: llama3.2
API Key: ollama
```
### Embedding Settings
By default, Context7 uses the same provider as your LLM for generating embeddings. You can configure a separate embedding provider if needed.
| Setting | Description |
| ------------------ | ----------------------------------------------------------- |
| Embedding Provider | `openai` or `gemini` |
| Embedding API Key | Separate API key for embeddings (falls back to LLM API key) |
| Embedding Model | Embedding model name (e.g. `text-embedding-3-small`) |
| Embedding Base URL | Custom embedding endpoint |
### Git Access Tokens
Configured via the **Settings** page in the web UI.
| Setting | Description |
| ------------ | -------------------------------------------------------------- |
| GitHub Token | GitHub Personal Access Token. Required for GitHub repositories |
| GitLab Token | GitLab token. Required for GitLab repositories |
You only need tokens for the platforms you use. If you only parse GitLab repos, you don't need a GitHub token, and vice versa. Create tokens with `repo` scope (GitHub) or `read_repository` scope (GitLab) for private repository access.
## Access Control
Admin credentials are set during first login (default: `admin` / `admin`). Change these immediately after setup via **Settings > Change Credentials**.
The Settings page lets you control which operations are available without authentication, including MCP and API search access.
| Permission | Default | Description |
| ------------------------------ | ------- | ---------------------------------------------------------------------------- |
| Allow anonymous parse | Off | Allow unauthenticated users to trigger parsing |
| Allow anonymous refresh | Off | Allow unauthenticated users to refresh libraries |
| Allow anonymous delete | Off | Allow unauthenticated users to delete libraries |
| Allow anonymous support bundle | Off | Allow unauthenticated support bundle downloads |
| Require MCP authentication | Off | Require a personal API key for `/mcp` and external `/api/v2` search requests |
When MCP authentication is enabled, each user creates personal keys from **Personal Settings > API Keys**. Clients send the key as `Authorization: Bearer `.
## Policies
Policies let you control which public documentation from the Context7 cloud is accessible to your on-premise instance. They do not affect locally parsed on-premise content.
Access Policies from **Settings > Policies** tab. Requires admin login and a valid `LICENSE_KEY`.
For details on source type toggles and library filters, see [Customizing What Is Retrieved](/security/data-privacy#customizing-what-is-retrieved).
## Web UI
Open your deployment URL in a browser to access the dashboard. From here you can:
* Add and remove libraries
* Trigger re-indexing
* Monitor parsing status and logs
* Update AI provider settings, git tokens, and permissions
* Configure policies for public cloud documentation access
* Test MCP connectivity
* Change admin credentials
## Operations
For updating, health checks, and other operational tasks, see the deployment guide for your platform:
* [Docker Operations](/enterprise/deployment/docker#operations)
* [Kubernetes Operations](/enterprise/deployment/kubernetes#operations)
## Support
For license issues, upgrade requests, or deployment questions, contact [context7@upstash.com](mailto:context7@upstash.com).
## Setup
Go to [context7.com/plans](https://context7.com/plans) and click **On-Premise Trial**. Fill out the request form. No credit card required. You'll receive a 30-day full-featured license key via email once approved.
Follow the deployment guide for your platform:
Deploy with Docker Compose
Deploy on Kubernetes with raw manifests
Open `http://localhost:3000` in your browser. On first launch, the setup wizard guides you through configuring:
1. **AI Provider** - Choose OpenAI, Anthropic, Gemini, or a custom OpenAI-compatible endpoint. Enter your API key and model name.
2. **Embedding Provider** - Use the same provider as your LLM, or configure a separate one for embeddings.
3. **Git Tokens** - Add a GitHub and/or GitLab token for the platforms you use.
All configuration is stored locally in the embedded database and can be updated later from the Settings page.
From the dashboard, click **Add Repository** and enter a GitHub or GitLab URL. Once ingestion completes, your private docs are ready to query.
You can also add libraries via the REST API:
```bash theme={null}
curl -X POST http://localhost:3000/api/parse \
-H "Content-Type: application/json" \
-d '{"repoUrl": "https://github.com/your-org/your-repo"}'
```
## Connecting Your AI Client
The Context7 CLI is the recommended way to connect an AI coding agent. Install it once on the machine that runs your client:
```bash theme={null}
npm install --global ctx7@latest
```
```bash theme={null}
npm install --global ctx7 \
--registry https://npm.internal.yourcompany.com
```
For restricted or air-gapped environments, mirror the `ctx7` package and its dependencies in your approved internal npm registry. Once installed, on-premise setup does not contact npm, GitHub, or Context7 Cloud. It uses bundled rule and skill content and contacts only your deployment to discover its MCP authentication setting.
Pass the root URL of your deployment (without `/mcp` or `/api`) and select the client:
```bash theme={null}
ctx7 setup --mcp \
--base-url https://context7.internal.yourcompany.com \
--claude
```
```bash theme={null}
ctx7 setup --mcp \
--base-url https://context7.internal.yourcompany.com \
--cursor
```
```bash theme={null}
ctx7 setup --mcp \
--base-url https://context7.internal.yourcompany.com \
--codex
```
```bash theme={null}
ctx7 setup --mcp \
--base-url https://context7.internal.yourcompany.com \
--opencode
```
Setup reads the deployment's MCP authentication setting. When MCP authentication is disabled, no credential is written. When it is enabled, sign in to the on-premise dashboard and click **Generate setup key** in the Connect card. Run the command for your client and paste the one-time-visible key when the CLI requests it with hidden input.
For non-interactive automation, provide the personal key through the environment:
```bash theme={null}
CONTEXT7_API_KEY=ctx7op-... ctx7 setup --mcp --yes \
--base-url https://context7.internal.yourcompany.com \
--claude
```
You can use `--api-key ctx7op-...` instead, but command-line arguments may be retained in shell history. Setup writes the MCP client configuration, a Context7 rule, and a bundled `context7-mcp` skill. The bundled files mean the deployment does not need to expose Context7 Cloud's skill APIs.
Custom `--base-url` setup uses the deployment's Streamable HTTP endpoint. Hosted OAuth, local stdio transport, and CLI-query mode are not available for on-premise targets.
### Manual configuration
If your client is not supported by `ctx7 setup`, point it at `/mcp`. When MCP authentication is enabled, send the personal key as a standard bearer token:
```json theme={null}
{
"mcpServers": {
"context7": {
"url": "https://context7.internal.yourcompany.com/mcp",
"headers": {
"Authorization": "Bearer ctx7op-..."
}
}
}
}
```
For other clients, see [All Clients](/resources/all-clients).
## Configuration
### Environment Variables
These are set in your `docker-compose.yml` or `.env` file before starting the container.
| Variable | Required | Description |
| ------------- | -------- | ------------------------------------------------------ |
| `LICENSE_KEY` | Yes | License key issued by Upstash |
| `PORT` | No | HTTP port (default: `3000`) |
| `DATA_DIR` | No | Data directory inside the container (default: `/data`) |
AI provider keys, model settings, and git tokens are **not** set via environment variables. They are configured through the setup wizard and can be updated anytime from the Settings page in the web UI.
### AI Provider Settings
Configured via the **Settings** page in the web UI.
| Setting | Description |
| ------------ | ------------------------------------------------------------------- |
| LLM Provider | `openai`, `anthropic`, `gemini`, or custom |
| LLM API Key | API key for your chosen provider |
| LLM Model | Model name (e.g. `gpt-4o`, `claude-sonnet-4-5`, `gemini-2.5-flash`) |
| LLM Base URL | Custom OpenAI-compatible endpoint (for local models or proxies) |
#### Examples
```
Provider: custom
Base URL: https://openrouter.ai/api/v1
Model: openai/gpt-4o
API Key: sk-or-v1-...
```
```
Provider: custom
Base URL: http://host.docker.internal:11434/v1
Model: llama3.2
API Key: ollama
```
### Embedding Settings
By default, Context7 uses the same provider as your LLM for generating embeddings. You can configure a separate embedding provider if needed.
| Setting | Description |
| ------------------ | ----------------------------------------------------------- |
| Embedding Provider | `openai` or `gemini` |
| Embedding API Key | Separate API key for embeddings (falls back to LLM API key) |
| Embedding Model | Embedding model name (e.g. `text-embedding-3-small`) |
| Embedding Base URL | Custom embedding endpoint |
### Git Access Tokens
Configured via the **Settings** page in the web UI.
| Setting | Description |
| ------------ | -------------------------------------------------------------- |
| GitHub Token | GitHub Personal Access Token. Required for GitHub repositories |
| GitLab Token | GitLab token. Required for GitLab repositories |
You only need tokens for the platforms you use. If you only parse GitLab repos, you don't need a GitHub token, and vice versa. Create tokens with `repo` scope (GitHub) or `read_repository` scope (GitLab) for private repository access.
## Access Control
Admin credentials are set during first login (default: `admin` / `admin`). Change these immediately after setup via **Settings > Change Credentials**.
The Settings page lets you control which operations are available without authentication, including MCP and API search access.
| Permission | Default | Description |
| ------------------------------ | ------- | ---------------------------------------------------------------------------- |
| Allow anonymous parse | Off | Allow unauthenticated users to trigger parsing |
| Allow anonymous refresh | Off | Allow unauthenticated users to refresh libraries |
| Allow anonymous delete | Off | Allow unauthenticated users to delete libraries |
| Allow anonymous support bundle | Off | Allow unauthenticated support bundle downloads |
| Require MCP authentication | Off | Require a personal API key for `/mcp` and external `/api/v2` search requests |
When MCP authentication is enabled, each user creates personal keys from **Personal Settings > API Keys**. Clients send the key as `Authorization: Bearer `.
## Policies
Policies let you control which public documentation from the Context7 cloud is accessible to your on-premise instance. They do not affect locally parsed on-premise content.
Access Policies from **Settings > Policies** tab. Requires admin login and a valid `LICENSE_KEY`.
For details on source type toggles and library filters, see [Customizing What Is Retrieved](/security/data-privacy#customizing-what-is-retrieved).
## Web UI
Open your deployment URL in a browser to access the dashboard. From here you can:
* Add and remove libraries
* Trigger re-indexing
* Monitor parsing status and logs
* Update AI provider settings, git tokens, and permissions
* Configure policies for public cloud documentation access
* Test MCP connectivity
* Change admin credentials
## Operations
For updating, health checks, and other operational tasks, see the deployment guide for your platform:
* [Docker Operations](/enterprise/deployment/docker#operations)
* [Kubernetes Operations](/enterprise/deployment/kubernetes#operations)
## Support
For license issues, upgrade requests, or deployment questions, contact [context7@upstash.com](mailto:context7@upstash.com).